

A substandard factory horn is more than a nuisance; it's a legitimate safety liability on modern roads. Most stock units lack the decibel range needed to cut through heavy cabin insulation and ambient traffic noise. This Hella Supertone Horns installation guide provides the technical framework required to upgrade your vehicle to a professional-grade 118dB warning system. You likely recognize that a louder presence improves safety, yet the prospect of complex relay wiring often prevents a successful DIY project.
We understand the frustration of vague diagrams and the fear of creating an electrical parasitic draw. This guide simplifies the process using ASE-certified methods for mounting and wiring. You'll learn how to identify secure mounting locations behind the grille and how to execute a clean, fused circuit that protects your electrical system. We'll walk through the specific tools, relay pinouts, and performance checks needed to ensure your new horns deliver maximum volume and long-term reliability.
Key Takeaways
- Understand the performance benefits of the 500Hz and 300Hz dual-tone frequency for improved audibility in high-traffic environments.
- Follow this Hella Supertone Horns installation guide to correctly wire the 12V relay using terminals 30, 85, 86, and 87.
- Identify secure mounting locations behind the grille that ensure maximum sound projection without obstructing radiator airflow.
- Troubleshoot common electrical failures such as relay clicking or "one horn only" operation with methodical diagnostic steps.
- Review the exhaustive tool and parts inventory required to achieve a professional-grade DIY installation in under 60 minutes.
Understanding the Hella Supertone Upgrade: Symptoms and Safety
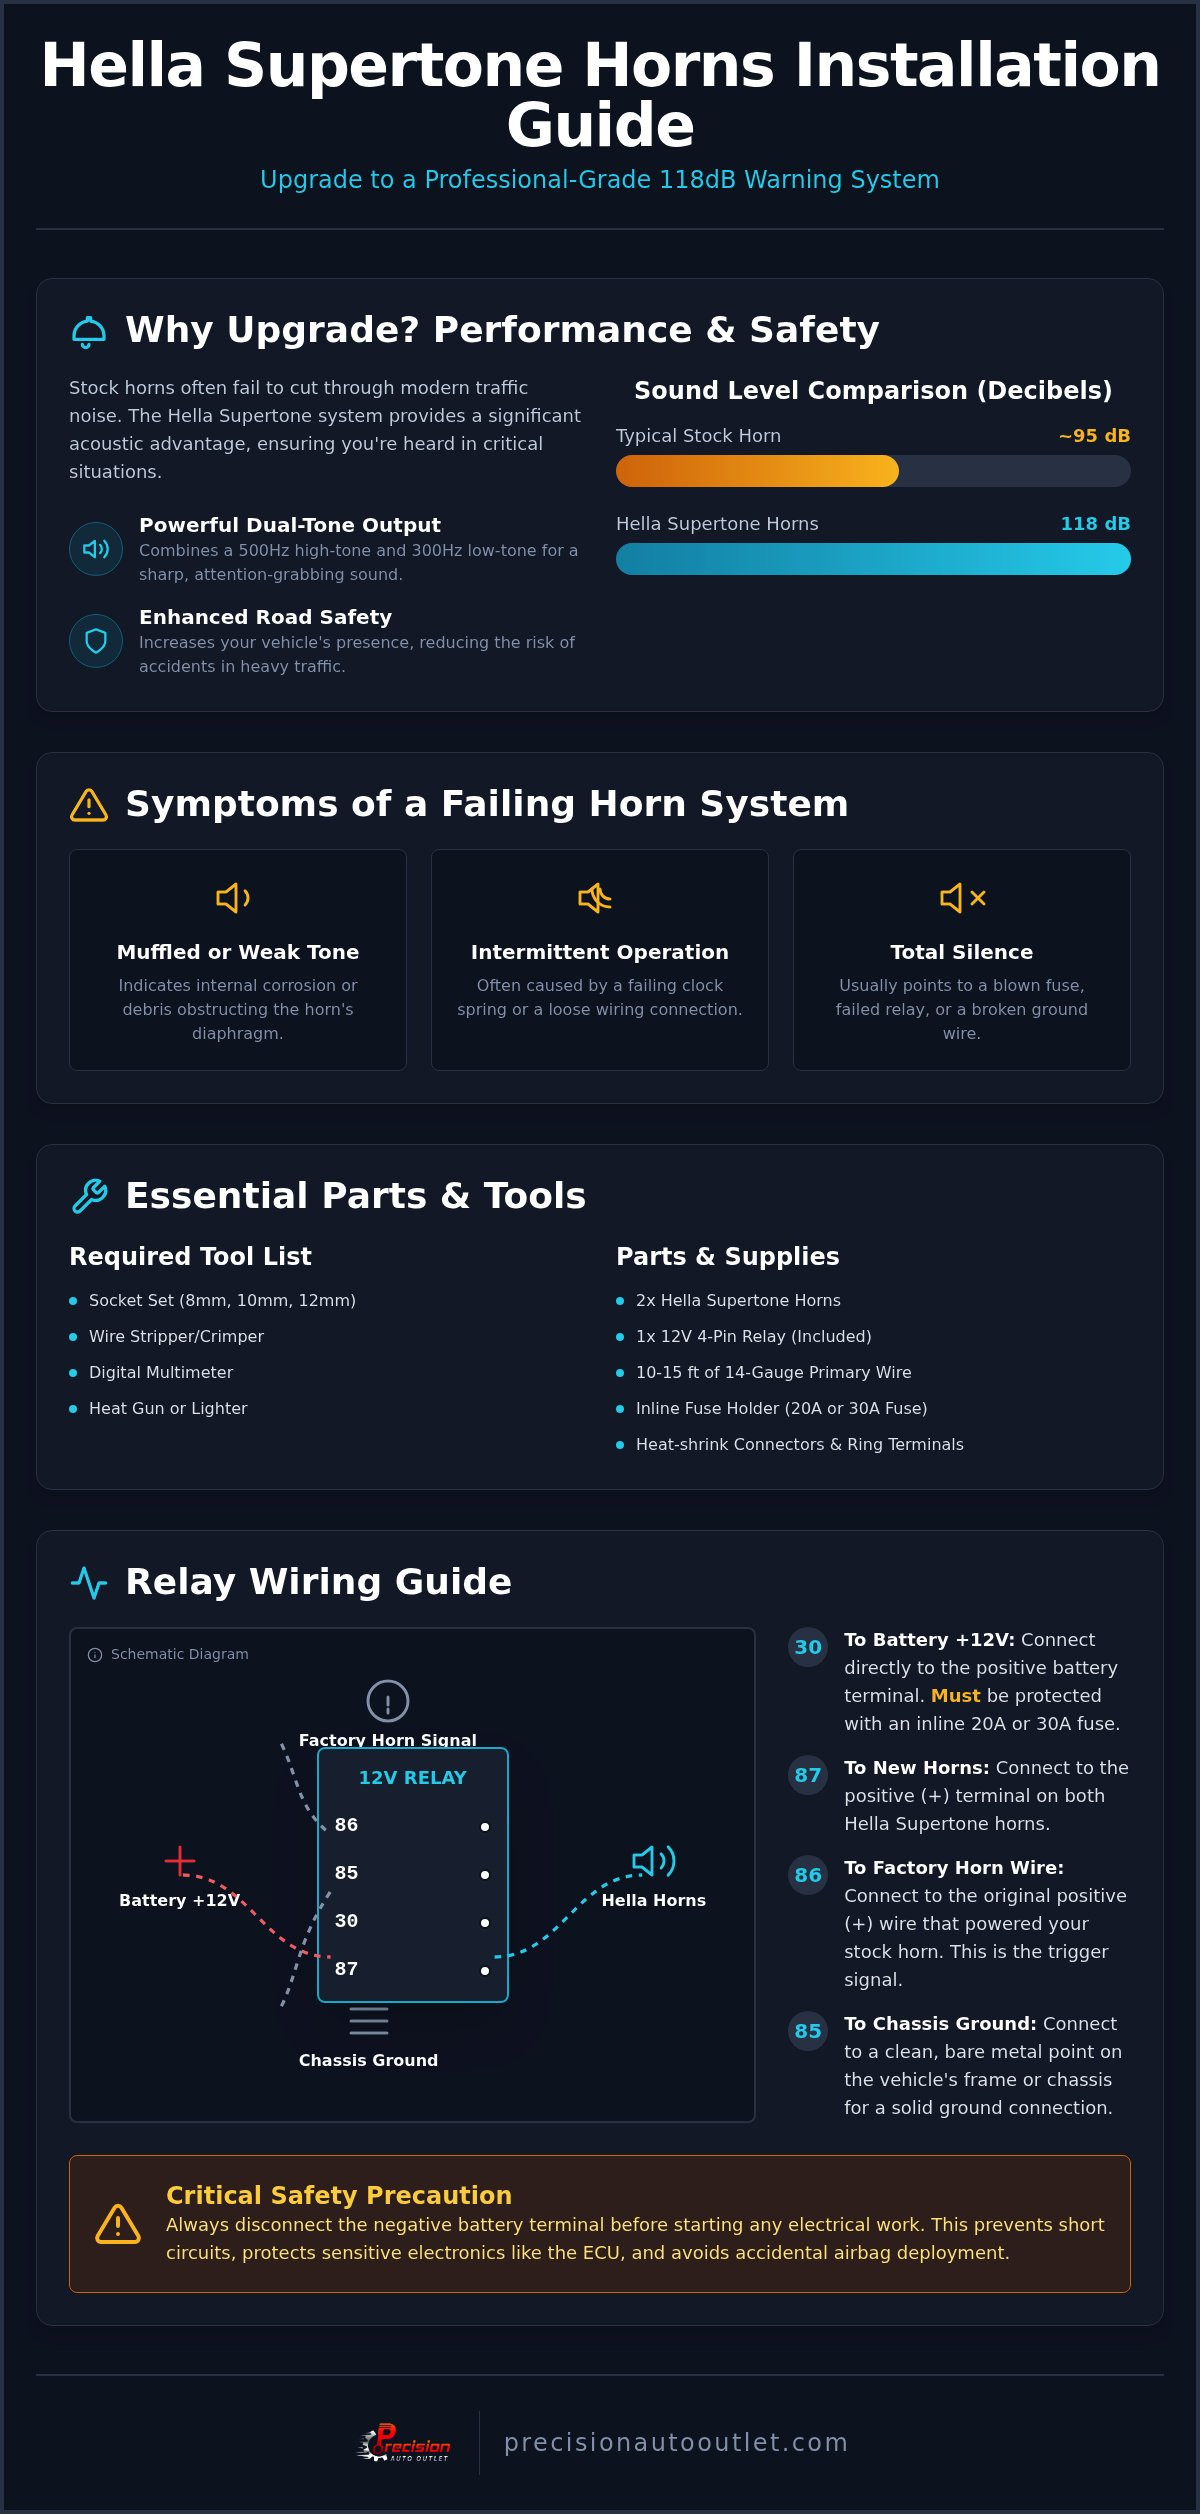
Hella Supertone horns are engineered for maximum acoustic penetration. While a standard Vehicle horn typically operates at a lower decibel range, the Supertone system generates a powerful 118 dB output. This performance is achieved through a dual-tone configuration, pairing a 500Hz high-frequency unit with a 300Hz low-frequency unit. This specific frequency gap creates a sharp, discordant sound that is significantly more effective at cutting through modern vehicle soundproofing and wind noise than stock components.
This Hella Supertone Horns installation guide is designed to help you replace an inadequate or malfunctioning system. Upgrading is often a necessity when OEM auto parts begin to degrade. Reliability is paramount because a non-functional horn is a failed safety inspection and a hazard on the road. Common failures often stem from environmental exposure, where road salt and moisture corrode the diaphragm or electrical terminals.
Symptoms of a Failing Horn System
- Muffled or Weak Tone: If your horn sounds "sick" or significantly quieter than usual, internal corrosion or debris likely obstructs the diaphragm.
- Intermittent Operation: A horn that only works when the steering wheel is turned at a specific angle typically indicates a failing clock spring or a loose wiring harness.
- Total Silence: A complete lack of sound usually points to a blown fuse, a failed relay, or a disconnected ground wire.
Before beginning your DIY auto repair, you should verify the integrity of the existing circuit. If the fuse is blown, it may indicate a short circuit that needs addressing before you install your new auto parts. Check the factory wiring for brittle insulation or green corrosion at the connectors.
Safety Protocols for DIY Auto Repair
Safety is the first priority when performing electrical upgrades. You must disconnect the negative battery terminal before touching any wiring. This simple step prevents accidental short circuits that could damage your ECU or trigger the airbag system. Wear eye protection when working behind the front grille, as road debris and rust can easily fall into your eyes during the mounting process.
Handling high-amperage circuits requires precision. Hella Supertones draw more current than most factory horns, often requiring up to 66 watts per unit. Attempting to run these directly through thin factory wires can lead to overheating or melted harnesses. Always use the included relay to isolate the high-current draw from your steering wheel switch. This ensures your vehicle's electrical system remains stable and your new aftermarket auto parts reach their full 118 dB potential.
Pre-Installation Preparation: Parts, Tools, and Cost Analysis
Successful execution of this Hella Supertone Horns installation guide requires a methodical approach to parts procurement and tool organization. While the standard kit provides the core acoustic units and a basic relay, a professional-grade installation necessitates additional wiring supplies to ensure long-term durability. Adhering to Federal horn regulations ensures your vehicle remains compliant while providing the 118dB output required for road safety. Proper preparation prevents mid-project delays and electrical failures caused by improper gauge selection or poor terminal crimps.
Essential Parts and Tools Tables
The following tables categorize the inventory needed for a clean, reliable setup. Using 14-gauge wire is critical to handle the current draw of the dual-tone system without voltage drop.
| Kit Components | Additional Wiring Supplies |
|---|---|
| 2x Hella Supertone Horns | 10-15 feet of 14-gauge primary wire |
| 1x 12V 4-Pin Relay | Inline fuse holder with 20A or 30A fuse |
| Mounting Brackets (Included) | Heat-shrink female spade connectors |
| Basic Instructions | Ring terminals and zip ties |
| Required Tool List | Function in Installation |
|---|---|
| Socket Set (8mm, 10mm, 12mm) | Removing grille and mounting horns |
| Wire Stripper/Crimper | Preparing and securing electrical terminals |
| Digital Multimeter | Testing for 12V power and ground continuity |
| Heat Gun or Lighter | Sealing heat-shrink connectors |
| Difficulty Level | Estimated Time |
|---|---|
| Beginner / Intermediate | 60 to 120 Minutes |
Economic Analysis: Professional vs. DIY
Automotive electrical labor rates vary by region, but most specialty shops bill a minimum of one hour for auxiliary horn installations. This professional fee does not include the cost of the hardware or the markup applied to shop supplies like wiring and fuses. Performing a DIY auto repair allows you to reinvest those labor savings into higher quality tools or additional new auto parts that improve vehicle health.
Sourcing high-quality aftermarket auto parts ensures the longevity of your electrical system. A DIY approach also provides the advantage of choosing your own mounting points and wire routing paths, which often results in a cleaner aesthetic than a rushed professional job. By following this Hella Supertone Horns installation guide, you gain the technical knowledge to troubleshoot your own electrical circuits in the future, providing long-term value far beyond the initial cost of the tools.
Step-by-Step Hella Supertone Installation and Wiring Guide
Executing a professional installation requires an understanding of electrical load management. This Hella Supertone Horns installation guide prioritizes a relay-driven circuit to ensure your vehicle meets NHTSA safety standards while protecting your factory wiring. Standard steering wheel switches aren't designed to handle the 12-amp draw of these high-output units. By using a relay, you use the factory signal to trigger a direct, fused connection from the battery, ensuring maximum volume and system longevity.
Mounting and Positioning
- Secure the Horn Units
- What to do: Identify existing 10mm or 12mm threaded holes on the radiator support and attach the Hella brackets using stainless steel bolts and lock washers.
- Why it matters: Proper mounting ensures the horns don't vibrate loose, which could cause a loss of ground continuity or physical damage to the radiator.
- Common mistakes to avoid: Don't mount the horns directly against the radiator fins. This can obstruct airflow and lead to engine cooling issues.
- Helpful tip: Aim the horn openings slightly downward to prevent water from pooling inside the acoustic chamber, which can deaden the sound.
The 4-Pin Relay Wiring Process
The relay acts as a heavy-duty switch. Understanding the "why" behind each pin connection is essential for a reliable DIY auto repair. Use 14-gauge wire for all power and ground paths to handle the current without resistance.
- Connect Pin 30 to the Battery
- What to do: Run a 14-gauge wire from Pin 30 on the relay to the positive battery terminal, installing an inline 20A fuse in the path.
- Why it matters: Pin 30 provides the high-amperage "muscle" required for the horns to reach their 118dB potential.
- Common mistakes to avoid: Never skip the inline fuse. Without it, an electrical short could cause a fire.
- Helpful tip: Keep the fuse holder within 12 inches of the battery for maximum protection of the wire run.
- Wire the Trigger (Pin 86)
- What to do: Connect Pin 86 to your vehicle's original horn power wire using a spade connector or a T-tap.
- Why it matters: This signal tells the relay to close the internal switch when you press the horn pad on the steering wheel.
- Common mistakes to avoid: Don't cut the factory harness too short; leave enough slack for future repairs or adjustments.
- Helpful tip: Use a multimeter to confirm which factory wire receives 12V only when the horn pad is pressed.
- Route Power to the Horns (Pin 87)
- What to do: Run a wire from Pin 87 to the positive terminals on both Hella horns.
- Why it matters: This pin delivers the high-current load from the battery only when the relay is activated.
- Common mistakes to avoid: Avoid using thin 18-gauge wire here, as it will create resistance and reduce the total sound output.
- Helpful tip: Use heat-shrink female spade connectors to protect these exposed connections from road salt and moisture.
- Establish the Grounds (Pin 85 and Horn Terminals)
- What to do: Connect Pin 85 and the remaining terminal on each horn to a clean, unpainted chassis point.
- Why it matters: A solid ground completes the circuit; without it, the relay won't click and the horns won't sound.
- Common mistakes to avoid: Don't ground to a painted bolt. Paint acts as an insulator and will cause intermittent operation.
- Helpful tip: Use a small wire brush or sandpaper to clear away paint and rust until you see bare metal at the grounding point.
Troubleshooting Common Issues and Maintenance Tips
Post-installation issues often stem from environmental exposure or mechanical vibration rather than component failure. If your horns fail to activate, begin by identifying if the relay is functioning. A distinct click from the relay indicates the trigger circuit is intact. If the relay clicks but the horns remain silent, the fault lies in the high-current path between the battery, relay Pin 87, or the horn grounds. This Hella Supertone Horns installation guide remains a vital reference for tracing these connections during a DIY auto repair.
Diagnostic Procedures
Use a digital multimeter to measure voltage at the horn spade terminals while an assistant depresses the horn pad. If you read 12V but have no sound, the internal coil may have failed or the diaphragm is obstructed. If you read 0V, inspect the inline fuse and the Pin 30 connection at the battery. Loose spade connectors or poor crimps account for a significant portion of intermittent failures. Ensure every terminal is tight and exhibits no movement when tugged.
When only one horn functions, the issue is typically localized to the wiring split. Check the jumper wires connecting the two units. A failed ground at one horn bracket will also cause "one horn only" operation. Clean the mounting surface to ensure a bare metal connection. If the relay does not click, the problem is likely in the trigger wire from the steering wheel or the ground at Pin 85. Testing the relay itself involves applying 12V to Pins 85 and 86 to check for continuity between Pins 30 and 87.
Long-Term Maintenance Tips
Preventive maintenance ensures your 118dB signal remains reliable through all seasons. Aftermarket auto parts mounted behind the radiator grille are vulnerable to road salt, moisture, and debris. Applying dielectric grease to every electrical connection prevents terminal oxidation. This is a critical step for maintaining low resistance in the circuit.
Check the tightness of the 10mm mounting bolts during every scheduled oil change. The high-frequency vibration of the Supertones can back out fasteners over time. This leads to a loss of ground continuity or physical detachment of the unit. Verify the integrity of your wiring looms and zip ties to ensure no wires are rubbing against sharp metal edges or hot engine components. If you find damaged wiring or corroded terminals, you can order new aftermarket auto parts to restore your system's integrity.
Annual inspections should include a quick test of the inline fuse holder. Moisture can sometimes seep into cheaper fuse housings, leading to "green crust" corrosion that increases resistance. Keeping these connections clean ensures your OEM auto parts and aftermarket upgrades function in harmony for years to come.
Optimizing Your Vehicle with Quality Aftermarket Parts
Safety is a multi-layered objective that requires a cohesive strategy. While this Hella Supertone Horns installation guide focuses on improving your audible presence, a professional-grade vehicle build addresses all critical response systems. High-decibel output serves as your primary warning signal, but the vehicle's mechanical ability to react is what prevents a collision. Integrating aftermarket auto parts that prioritize performance ensures your vehicle remains responsive under high-stress driving conditions. This utilitarian approach to vehicle health treats the horn, brakes, and engine as a single, interconnected safety unit.
Complementary Performance Upgrades
Audible warnings provide the split-second notice needed for other safety systems to engage. Upgrading to Brembo Ceramic Brake Pads complements your new horn system by providing superior thermal stability and stopping power. These pads ensure that when you use your 118dB signal, your vehicle's braking system is prepared to handle the resulting maneuver. Relying on stock components for heavy-duty use often leads to brake fade, which negates the safety benefits of a louder horn.
Electrical reliability also depends on the overall health of the powertrain. Maintaining internal engine cleanliness with ACDelco Gold Oil Filters protects the mechanical components that drive your alternator. A stable charging system is necessary to provide the consistent high-amperage current required by Hella Supertones. Using premium OEM auto parts for routine maintenance prevents parasitic mechanical issues from affecting your electrical upgrades. High-efficiency filtration keeps the engine running smoothly, ensuring the battery remains fully charged for emergency signal use.
Conclusion and Final Recommendations
Completing a professional-grade DIY auto repair builds technical competence and ensures the job is done to your specific standards. This Hella Supertone Horns installation guide provides the technical foundation, but you should always consult your factory service manual to verify model-specific wiring colors. Finalize your project by performing a system check in an open area to confirm the full 118dB performance. Ensure all 14-gauge wires are secured with zip ties away from moving parts or high-heat sources like the exhaust manifold.
A methodical approach to vehicle maintenance involves regular inspections of both electrical and mechanical systems. Verify that your mounting brackets remain tight and that your relay stays free of moisture. By combining high-output signaling with superior braking and filtration, you create a safer driving environment for yourself and others. Precision in parts selection is the difference between a temporary fix and a long-term safety solution.
Looking for quality new OEM or aftermarket replacement parts? Precision Auto Outlet offers dependable parts for many makes and models at competitive prices. Browse our catalog to find the right part for your repair.
Achieving Maximum Audible Impact and Safety
Mastering this Hella Supertone Horns installation guide ensures your vehicle possesses the audible presence required for modern traffic conditions. The transition from a weak factory signal to a professional 118dB output depends entirely on your commitment to a dedicated relay circuit and clean chassis grounds. You've now gained the technical framework to execute a DIY auto repair that rivals professional shop standards. By prioritizing high-quality aftermarket auto parts and maintaining critical systems like brakes and filtration, you ensure total vehicle reliability.
Precision Auto Outlet serves as an authorized retailer for Hella, Brembo, and ACDelco components. We provide the expert technical support needed to guide you through every stage of your vehicle upgrade. Looking for quality new OEM or aftermarket replacement parts? Precision Auto Outlet offers dependable parts for many makes and models at competitive prices. Browse our catalog to find the right part for your repair.
Your commitment to high-performance maintenance keeps your vehicle safe and responsive on the road. Proceed with confidence on your next installation.
Frequently Asked Questions
Do Hella Supertone horns require a relay for installation?
Yes, Hella Supertones require a relay for a safe and effective installation. These horns draw approximately 12 amps, which exceeds the capacity of most factory horn circuits. Using a relay allows the horns to pull power directly from the battery while using your original horn wire as a low-current trigger. This prevents the steering wheel clock spring from burning out and ensures the horns receive the full voltage needed for maximum volume.
Are Hella Supertones plug-and-play with my factory wiring?
Generally, no, Hella Supertones are not plug-and-play with most factory wiring. Most vehicles require a custom wiring harness or the use of the included 4-pin relay to function correctly. While some aftermarket brackets and adapters exist for specific models like the Subaru WRX, a professional Hella Supertone Horns installation guide always recommends a dedicated fused circuit. This setup ensures safety and consistent 118dB performance while protecting your vehicle's sensitive electrical components.
How loud are Hella Supertone horns compared to stock?
Hella Supertones produce 118 dB of sound, which is substantially louder than the 90 to 105 dB range of most factory units. Because the decibel scale is logarithmic, a 10 dB increase represents a sound that is roughly twice as loud to the human ear. This ensures your signal penetrates modern vehicle soundproofing and ambient road noise. The dual-tone frequency of 300Hz and 500Hz is specifically designed to be heard in emergency situations.
What gauge wire should I use for Hella horn installation?
You should use 14-gauge primary wire for all high-current paths in this Hella Supertone Horns installation guide. This includes the connections from the battery to the relay and from the relay to the horns. Thinner wire creates electrical resistance, which reduces the voltage reaching the horns and lowers their total sound output. Using the correct gauge ensures your horns reach their full acoustic potential without overheating the electrical harness during prolonged use.
Can I mount Hella horns behind my car’s grille?
Yes, behind the front grille is the preferred mounting location for optimal sound projection. You must ensure the units are secured to a sturdy metal support, such as the radiator core support, using 10mm or 12mm bolts. Always point the horn openings slightly downward to prevent water accumulation inside the housing. Proper positioning ensures the 118dB output is directed toward other motorists rather than being muffled by internal engine components or heavy body panels.
Will installing Hella Supertones drain my car battery?
No, these horns only draw power when the horn button is actively depressed. Since the relay isolates the high-current draw, there is no parasitic drain on the battery when the vehicle is off. However, you should always include an inline fuse to protect the circuit from potential short circuits. Using a high-quality battery like an Optima BlueTop ensures your electrical system has the reserve capacity to handle auxiliary upgrades without compromising starting performance.
Do I need to replace the factory horn fuse?
You don't need to change the factory fuse if you use a relay. The factory fuse continues to protect the low-current trigger circuit, while a new 20A or 30A inline fuse protects the dedicated power wire running from the battery to the relay. This dual-fuse approach is a standard safety protocol for high-draw electrical upgrades. It prevents a fault in the new horn circuit from disabling other critical factory components on the same OEM circuit.


