

Did you know that a professional spark plug replacement can cost as much as $394, with labor charges often accounting for more than $260 of that total? It's a significant expense for a service that many dedicated DIYers can complete at home with the right technical guidance. If your vehicle is struggling with engine hesitation during acceleration or a noticeable drop in fuel efficiency, you're likely experiencing the primary signs of failing spark plugs. These components are the diagnostic windows into your engine's health; ignoring their wear can lead to severe catalytic converter damage or complete ignition failure.
It's frustrating to deal with a rough idle or the anxiety of potential engine damage. This comprehensive guide will help you confirm your diagnosis and teach you how to execute a professional-grade replacement to restore lost power. We'll break down specific symptoms, explain how to interpret electrode wear, and provide a step-by-step technical walkthrough for installing high-quality aftermarket auto parts like NGK Laser Iridium plugs to ensure maximum combustion efficiency.
Key Takeaways
- Identify the primary signs of failing spark plugs, such as engine misfires, rough idling, and significant drops in fuel economy.
- Analyze the mechanical causes of ignition failure, including electrode erosion and ceramic insulator damage, to assess overall engine health.
- Execute a professional-grade DIY replacement using a structured safety protocol that prioritizes engine cooling and cylinder head protection.
- Evaluate the cost-efficiency of performing your own repairs versus professional service while selecting high-performance NGK Laser Iridium components.
- Restore engine power and efficiency by choosing the correct aftermarket auto parts based on material science and manufacturer specifications.
Identifying Primary Symptoms of Failing Spark Plugs
The engine control unit (ECU) constantly monitors combustion efficiency through the crankshaft position sensor and oxygen sensors. When the ECU detects a lapse in the combustion cycle, it logs a P0300 series fault code, triggering the 'Check Engine' light. This is one of the most definitive signs of failing spark plugs. A misfire occurs when the ignition system fails to deliver a sufficient spark to ignite the compressed air-fuel mixture. This technical failure often stems from electrode erosion. This process increases the gap size and requires higher voltage than the ignition coil can provide. Poor fuel economy is a direct result of this ignition delay. If the spark is weak or late, the flame front doesn't travel through the cylinder fast enough to complete the burn before the exhaust valve opens. This wastes thermal energy and forces the ECU to adjust fuel trim levels, often increasing consumption by up to 30%.
Driveability and Performance Warning Signs
Weak ignition leads to extended cranking times, commonly referred to as "hard starts." Because the initial spark isn't strong enough to bridge the gap under cold-start conditions, the starter motor must work longer to achieve combustion. During operation, you might notice engine surging. This is caused by inconsistent combustion cycles. The engine momentarily loses power then regains it as the plugs intermittently fire. Under heavy load, failing plugs often fail completely. High cylinder pressure increases the electrical resistance across the gap. Understanding basic Spark Plug Operation helps clarify why these components struggle as internal pressures rise. You'll feel this as a lack of "get-up-and-go" when merging onto highways or towing.
Auditory and Sensory Indicators
Incomplete combustion forces raw fuel into the exhaust manifold. This leads to a distinct "popping" sound as the fuel ignites against the hot exhaust walls. You'll likely notice a sharp gasoline odor from the tailpipe. This indicates a rich exhaust condition that can quickly overheat and melt the internal substrate of your catalytic converter. At a stop, a rough idle creates a rhythmic shudder felt through the steering wheel or seat. While a transmission issue might cause a steady vibration, an ignition-related shudder is typically erratic. It usually clears up once the engine RPM increases and the alternator provides higher system voltage. Sluggish acceleration often accompanies these vibrations, as the engine cannot effectively convert fuel into mechanical energy without a precise spark.
Mechanical Causes of Spark Plug Fouling and Failure
Understanding why ignition components fail is the first step in a successful DIY auto repair. High-voltage arcs naturally degrade metal through a process called electrode erosion. Every time the plug fires, the electrical discharge blasts away microscopic particles of the center and ground electrodes. Over time, this increases the air gap beyond manufacturer specifications. This makes it harder for the spark to jump. Thermal shock also contributes to failure. Rapid temperature fluctuations within the combustion chamber can cause the ceramic insulator to crack. These hairline fractures allow electricity to "leak" to the engine block instead of reaching the electrode. This results in a weak or non-existent spark.
The evaporative emission (EVAP) system plays a supporting role in maintaining plug health. If the purge valve fails, it can introduce excessive fuel vapors into the intake manifold at the wrong time. This disrupts the stoichiometric air-fuel ratio. This imbalance often leads to carbon fouling, which is one of the most common signs of failing spark plugs in vehicles driven primarily in stop-and-go traffic.
Reading Your Spark Plugs: A Visual Diagnostic Guide
Analyzing the physical condition of a removed plug provides a clear window into engine health. You should look for these specific indicators:
- Normal Appearance: A healthy plug features light tan or gray deposits on the insulator tip. This indicates the engine is running at the correct temperature.
- Wet Fouling: A damp, black coating suggests an over-rich fuel mixture or a failing ignition coil. If the substance is thick and tacky, it's likely oil fouling from leaking valve seals or worn piston rings.
- Melted Electrodes: This signifies extreme overheating or pre-ignition. Modern iridium plugs have a melting point of 4,435°F; seeing melted metal suggests a dangerous lean-running condition.
- Ash Deposits: Light-colored, crusty build-up usually results from oil additives. While the oil burns off, these minerals remain and can eventually bridge the electrode gap.
Environmental and Maintenance Factors
Internal engine cleanliness is paramount for ignition longevity. Using high-efficiency ACDelco Gold Oil Filters helps remove contaminants that might otherwise bypass seals and contribute to ash deposits on your plugs. Similarly, old or clogged air filters restrict oxygen intake. This forces the engine into a "rich" state that accelerates carbonization on the insulator. Short-trip driving also prevents plugs from reaching their "self-cleaning" temperature. Plugs generally need to hit 450°C to 850°C to burn off carbon naturally. If your commute is too short, these deposits accumulate until the plug can no longer fire effectively.
Step-by-Step DIY Spark Plug Replacement Protocol
Once you've confirmed the signs of failing spark plugs through visual inspection or diagnostic trouble codes, the next phase is the physical replacement. This procedure requires a disciplined approach to prevent engine damage. You must start with a completely cool engine. Aluminum cylinder heads expand significantly when hot; removing a steel spark plug from a hot head can strip the delicate threads. Always disconnect the negative battery terminal to eliminate the risk of electrical shorts while you work around the ignition coils and fuel system components.
Debris management is the most overlooked part of a successful DIY auto repair. Before you remove the old plugs, use compressed air to blow out the spark plug wells. Sand, grit, or small pebbles often accumulate in these recesses. If this debris falls into the combustion chamber after the plug is removed, it can cause immediate scoring of the cylinder walls. Use a small amount of dielectric grease inside the spark plug boot to prevent moisture intrusion and future sticking. Only use anti-seize on the threads if specifically recommended by your factory service manual, as it can lead to over-torquing on plated plugs.
Essential Tools and Safety Equipment
| Tool Name | Specific Function |
|---|---|
| Spark Plug Socket | Features a rubber insert to grip and protect the ceramic insulator. |
| Extension Bar | Provides necessary reach for recessed "deep well" plug locations. |
| Torque Wrench | Ensures the plug is seated to exact manufacturer specifications. |
| Feeler Blades | Used to verify the precise gap between the center and ground electrodes. |
Safety Note: Never attempt to change plugs on a hot aluminum head. Wait at least two hours after driving. Always consult your factory service manual for the exact torque values for your specific engine model.
The 10-Step Installation Walkthrough
- Disconnect the negative battery terminal. This eliminates the risk of accidental electrical shorts or fuel vapor ignition while working near the ignition system. Why it matters: Safety is paramount when working with high-voltage components. Common Mistake: Neglecting this step can lead to blown fuses or ECU damage. Helpful Tip: Wrap the cable end in a dry shop rag to prevent it from accidentally touching the terminal post.
- Remove the ignition coils or spark plug wires. You must clear the path to the plug wells to begin the extraction. Why it matters: You cannot reach the plugs without removing the delivery source. Common Mistake: Pulling on the rubber boot or wire can tear the internal conductor. Helpful Tip: Use a specialized puller or gently twist the boot to break the seal before pulling straight up.
- Clear the spark plug wells with compressed air. Removing grit and sand prevents contaminants from falling directly into the cylinder head. Why it matters: Cleanliness prevents internal engine damage. Common Mistake: Skipping this step often causes immediate cylinder wall scoring when the plug is removed. Helpful Tip: Wear safety goggles during this process to protect your eyes from flying debris.
- Loosen and remove the old spark plugs. This step allows you to extract the worn components and inspect for the signs of failing spark plugs. Why it matters: It provides a final diagnostic check of the combustion chamber health. Common Mistake: Forcing a seized plug can snap the metal shell in the head. Helpful Tip: If the plug is stuck, apply penetrating oil and let it sit for ten minutes before trying again.
- Verify the electrode gap on new plugs. Proper gapping ensures the ignition coil can efficiently bridge the air space to create a strong spark. Why it matters: Incorrect gaps lead to misfires and poor fuel economy. Common Mistake: Assuming "pre-gapped" plugs are correct often leads to issues if they were bumped during shipping. Helpful Tip: Use a wire-type gap gauge for iridium plugs to avoid damaging the delicate center electrode.
- Apply dielectric grease to the boots. This prevents high-voltage "flashover" and keeps the rubber from seizing to the ceramic insulator. Why it matters: It ensures a consistent electrical path and future ease of maintenance. Common Mistake: Smearing grease directly on the plug's metal terminal can cause a poor electrical connection. Helpful Tip: Apply a pea-sized amount only to the internal ribbed section of the rubber boot.
- Hand-thread the new spark plugs. Starting by hand ensures the threads are properly aligned with the cylinder head. Why it matters: It prevents permanent damage to the engine block. Common Mistake: Using a ratchet immediately is the leading cause of cross-threading, which requires expensive head removal to fix. Helpful Tip: Use a short piece of vacuum hose over the plug tip to extend your reach into deep wells.
- Torque the plugs to manufacturer specifications. Correct torque ensures the plug is seated firmly for proper heat dissipation into the cooling system. Why it matters: Proper seating prevents gas leakage and overheating. Common Mistake: Under-tightening causes gas leakage, while over-tightening can crack the plug's internal seal. Helpful Tip: Always consult your factory service manual for the exact foot-pound or inch-pound rating.
- Reinstall the ignition coils and retaining bolts. This reconnects the high-voltage source to the newly installed plugs. Why it matters: Secure connections prevent erratic firing. Common Mistake: Forgetting to tighten the coil bolts can lead to intermittent "Check Engine" lights from vibration. Helpful Tip: Ensure you hear a distinct "click" when pressing the coil back onto the plug.
- Reconnect the battery and test start the engine. This restores power to the system so you can verify the success of the repair. Why it matters: It confirms that the ignition system is functioning correctly before you drive. Common Mistake: Leaving tools on the engine block can cause damage when the motor vibrates at startup. Helpful Tip: Listen for a smooth, consistent idle before closing the hood.
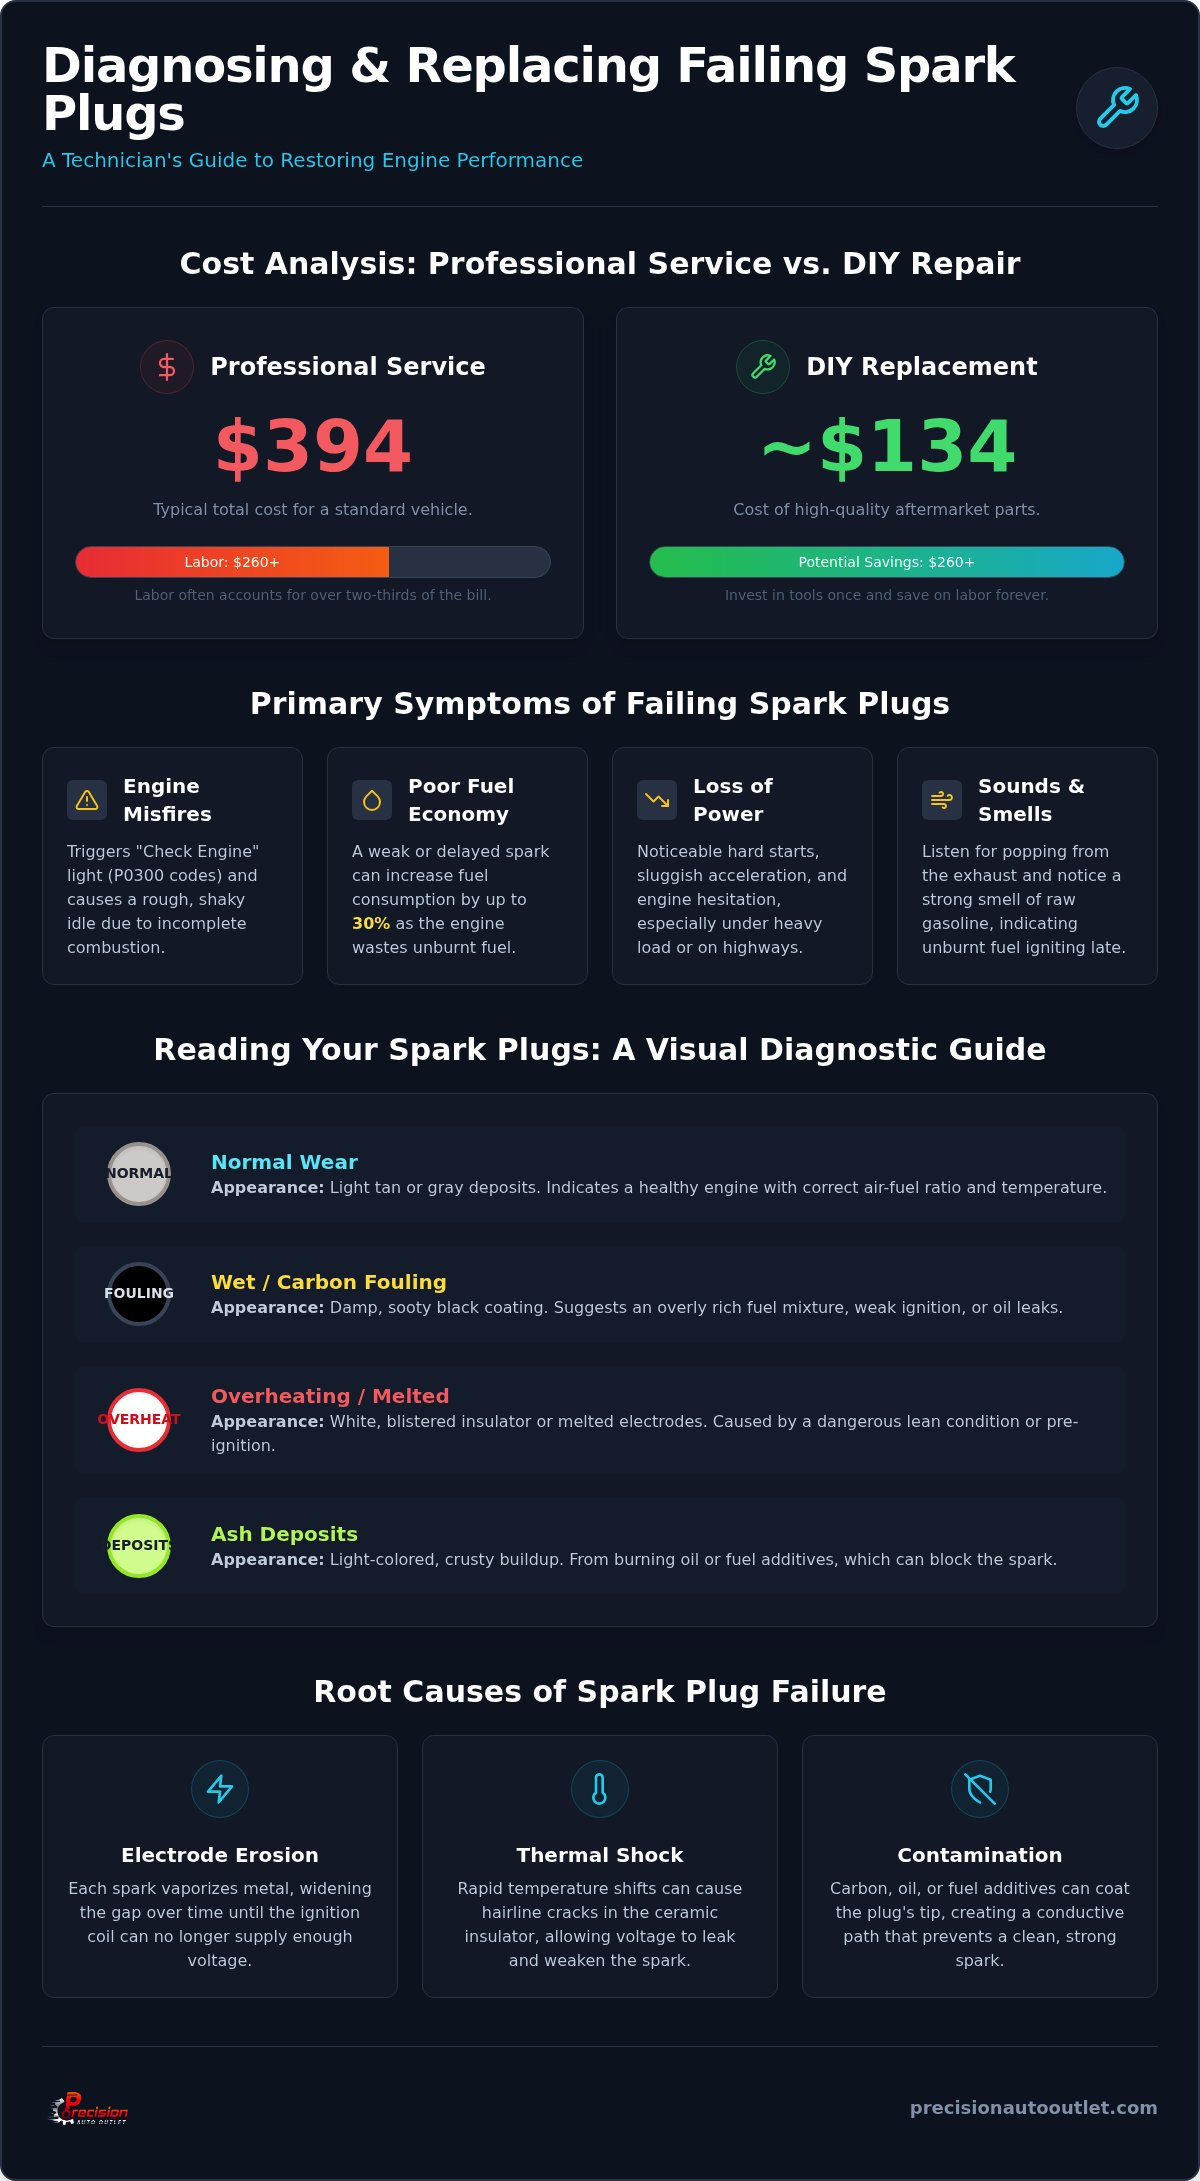
Cost Analysis: Professional Service vs. DIY Repair
Ignoring the primary signs of failing spark plugs is a significant financial liability. While a set of plugs is a relatively low-cost investment, the national average for a professional spark plug replacement ranges from $281 to $394. Technical labor accounts for the majority of this expense, with shops typically billing between $182 and $267 for the service. Dealerships often charge premium hourly rates compared to independent repair shops, especially for V6 or V8 engines where intake manifold removal is required to access the rear cylinder banks. By performing a DIY auto repair, you eliminate these labor markups and ensure the use of high-specification components like NGK Laser Iridium Spark Plugs.
There are also hidden costs associated with ignition neglect. When a plug fails to fire, raw fuel enters the exhaust stream and ignites inside the catalytic converter. This thermal event can melt the converter's internal ceramic substrate, leading to a repair bill that often exceeds $1,500. Sourcing components through wholesale automotive suppliers allows DIYers to maintain a professional maintenance schedule without the service center overhead. This proactive approach protects your fuel economy and prevents expensive secondary system failures.
Repair Difficulty and Time Estimation
| Engine Configuration | Access Difficulty | Beginner Time | Experienced Time |
|---|---|---|---|
| 4-Cylinder (FWD/RWD) | 3/10 (Low) | 2 Hours | 45 Minutes |
| V6 (Transverse) | 7/10 (High) | 4 Hours | 2 Hours |
| V8 (Longitudinal) | 5/10 (Moderate) | 3 Hours | 1.5 Hours |
Financial Breakdown: Professional vs. DIY
| Expense Category | Professional Service | DIY Replacement |
|---|---|---|
| Labor Charges | $182 - $267 (Average) | $0.00 |
| Parts Markup | 25% - 50% over retail | None (Direct Retail) |
| Tool Investment | Included in shop fee | One-time purchase |
| Total Estimated Cost | $281 - $394 | Parts Only |
The long-term return on investment for a DIY replacement is substantial. Beyond the immediate labor savings, new plugs restore optimal combustion. This can improve fuel efficiency by several miles per gallon, effectively paying for the parts within a few months of driving. Always consult your factory service manual for model-specific procedures before beginning work.
Selecting Quality Replacement Parts and Maintenance
Material selection directly impacts how long you can avoid the signs of failing spark plugs. While copper plugs are inexpensive, they usually only last 20,000 to 30,000 miles. Platinum extends this interval to roughly 60,000 miles. However, iridium is the current industry standard for a reason. Iridium is six times harder and eight times stronger than platinum. It has an incredibly high melting point of 4,435°F. This durability allows for ultra-fine electrode designs, sometimes as narrow as 0.4mm. These narrow tips focus the electrical spark for more efficient combustion and better cold-start performance. Using premium new auto parts like NGK Laser Iridium Spark Plugs ensures your ignition system can handle the high cylinder pressures found in modern turbocharged engines.
Establishing a proactive maintenance schedule is better than waiting for a breakdown. While many owners wait for a "Check Engine" light, seasoned technicians recommend inspecting plugs every 50,000 miles. This allows you to catch early electrode erosion before it stresses your ignition coils. Sourcing your components from a reputable supplier prevents the risk of installing counterfeit parts. Fake plugs often use inferior steel instead of iridium, which can lead to catastrophic engine failure if the electrode melts and falls into the cylinder.
OEM vs. Aftermarket: Making the Right Choice
For many vehicles, high-quality aftermarket auto parts offer better performance than the original factory components. You should generally stick to OEM auto parts for sensitive European engines that rely on specific resistance values for their diagnostic systems. However, in most domestic and Japanese applications, NGK components often exceed factory specifications for longevity. Always verify the part number against your vehicle's VIN to ensure the heat range is correct. Avoiding "too good to be true" prices on major open marketplaces is the best way to ensure you're getting genuine, high-specification materials.
Preventative Ignition System Care
Don't stop at the plugs during your DIY auto repair. You should inspect your ignition coils and wires for hairline cracks or carbon tracking during every service. A clean intake air stream also preserves the life of your ignition source. Installing a K&N Performance Air Filter prevents abrasive particulates from entering the combustion chamber. This reduces the mechanical wear on the electrodes. The 100,000-mile service interval is largely a myth for modern Gasoline Direct Injection (GDI) engines. These engines are harder on plugs due to higher temperatures and pressures. Aim for a replacement every 60,000 to 80,000 miles to maintain peak fuel economy.
Looking for quality new OEM or aftermarket replacement parts? Precision Auto Outlet offers dependable parts for many makes and models at competitive prices. Browse our catalog to find the right part for your repair.
Restore Your Engine's Performance and Efficiency
Proactive maintenance is the most effective way to protect your vehicle's longevity and fuel economy. By recognizing the primary signs of failing spark plugs early, you prevent secondary damage to expensive ignition coils and catalytic converters. A successful DIY auto repair relies on technical precision, including proper debris management and strict adherence to factory torque specifications. Transitioning to premium materials like iridium provides the thermal resistance necessary for high-compression modern engines. Precision Auto Outlet serves as an authorized retailer of NGK Laser Iridium Spark Plugs, offering the expert technical support and extensive inventory required for professional-grade results. You've gained the diagnostic skills to identify fouling and the mechanical steps to execute a flawless installation. You're ready to restore your engine's power while saving significantly on service center labor costs.
Looking for quality new OEM or aftermarket replacement parts? Precision Auto Outlet offers dependable parts for many makes and models at competitive prices. Browse our catalog to find the right part for your repair.
Frequently Asked Questions
How much does it cost to replace spark plugs?
Professional spark plug replacement costs vary by engine type, typically ranging from $80 to $200 for a 4-cylinder vehicle. Owners of V6 engines can expect to pay between $120 and $400, while V8 engines often range from $160 to $500 depending on access difficulty. If you perform a DIY auto repair, your costs are limited to parts, with premium iridium plugs generally priced between $8 and $30 each.
Can I drive with a bad spark plug?
You shouldn't drive with a bad spark plug because it causes immediate engine damage and catalytic converter failure. A misfiring cylinder sends raw gasoline into the exhaust system, which raises the temperature of the converter substrate until it melts. This condition also creates severe vibrations that can damage engine mounts and internal bearings over a short distance.
Do I need to replace all spark plugs at once?
You must replace all spark plugs simultaneously to maintain balanced engine performance and consistent combustion timing. Spark plugs wear at a uniform rate across all cylinders under normal operating conditions. Replacing only one plug creates uneven electrical resistance, which forces the engine control unit to struggle with fuel trim adjustments and leads to a rough idle.
What happens if I don't change my spark plugs?
Neglecting to address the signs of failing spark plugs results in total ignition failure and expensive secondary mechanical repairs. As the electrode gap widens, the ignition coil must work harder to bridge the space, which eventually causes the coil to burn out. You'll also experience a significant drop in fuel economy and increased carbon buildup on your valves.
Is it easy to change spark plugs yourself?
Changing spark plugs is a manageable task for most beginners, typically requiring about two hours of work. Most front-wheel-drive 4-cylinder engines provide easy access to the plugs on the top of the cylinder head. However, some V6 and V8 configurations require the removal of the intake manifold or other components, which increases the technical difficulty of the job.
How do I know if my spark plugs are fouled or just old?
You can distinguish between fouled and old plugs through a physical inspection of the insulator tip and electrodes. Old plugs show a wide gap but maintain a light tan or gray color on the porcelain. Fouled plugs appear coated in black carbon or oily residue, indicating an underlying engine issue such as a rich fuel mixture or leaking valve seals.
Why is my car shaking after I changed the spark plugs?
Post-installation shaking usually indicates a loose ignition wire, a cracked ceramic insulator, or an incorrect electrode gap. If a plug is dropped during installation, the ceramic can develop hairline fractures that cause the spark to short-circuit to the engine block. Verify that each ignition coil is fully seated and that the wires are connected in the correct firing order.
Should I use anti-seize on my new spark plugs?
You shouldn't use anti-seize on most modern aftermarket auto parts like NGK plugs because they feature a special trivalent metal plating. This zinc-chromate coating is designed to prevent corrosion and seizing in the cylinder head without additional lubricants. Adding anti-seize can lead to over-torquing, which potentially strips the threads in aluminum cylinder heads.


